
Wednesday, August 30, 2006
Renovation progress Update... Painting
There are lots of different finishes to the various paints and depending on the activities of the room, the finish will definitely come into play.
Our selections span across different brands, from Wash&Wear from ICI Dulux to Odour-less from Nippon...
Like we mentioned before... we only selected our paints from Nippon and ICI Dulux, so could only do a comparison between these two brands.
Between Nippon and ICI Dulux, we felt that the ICI range of products seems to be a combination of two or three Nippon products, and vice-versa.
Selecting a Nippon range, say Medi-fresh is like getting a mixture of ICI All-in-one plus Supreme 3-in-1... or
Selecting a ICI Dulux range, say Supreme 3-in-1 is like getting a mixture of Nippon Wash&Wear and Medi-fresh(without the anti-bacterial component)... etc
When Nippon advertised the Odourless paint series, it does not mean it is odourless... it means odour-less... as in less odour, NOT totally no odour... so take note :)
So here is the comparison that we compiled...
Nippon All-in-one is very similar to the ICI Dulux All-in-one
Nippon Medi-fresh is very similar to the ICI Dulux All-in-one and Supreme 3-in-1
Nippon EasyWash is very similar to the ICI Dulux Supreme 3-in-1 and Wash&Wear
Nippon 3-in-1 SoftMatt is very similar to the ICI Dulux Pentalite range
Mentioned in my earlier article, we actually took a sponge and a wet tissue to test if the paints we selected are as washable as the catalogs claimed them to be, and we were very satisfied with the results...
If you are going for a washable surface, Matte paints are a big no no. Once you apply the sponge on it, the matte surfaces gets polished off, leaving a low shiny sheen on the area that was scrubbed. When viewed at an angle, there will be shiny patches among the matte wall. Not very nice.
If you are going for a spot light fixture for a particular wall, then a Matte finish is very important. This is because the light from the spot light will not reflect too much off the wall, and will be able to create the desired effect of the shadow/light cast on the wall.
Our finished paint works...


Prev: Paints... what to choose? how to choose?
Next: Air-con... How to select?
Paints... what to choose? how to choose?
One of the most challenging tasks in our renovation so far, has got to be choosing the colours for the home.
When we first got our colour catalogs from the various paint shops, we were thinking... "with so many colours to choose from, we will definately find the ones we like in a jiffy!"
Boy were we wrong! There are so many choices, you don't know where to start!
There are various brands that offer a whole range of colour and finishes for your painting needs. The most popular paint brands are ICI and Nippon. So the discussion will mostly be surrounding these two brands.
Hopefully, sharing our experience, would help you when it is time to make a choice for your colour selection.
After all, the tone of a room, is ultimately set by the paint color.
Tip 1 ALWAYS be Patient
Given the infinite combination of colours available in the market today, it is important that one be patient when sitting down with your partner to select the righ colour scheme that is suitable for both of you. Given the asian context here, there is bound to be some external factors that affect the choice of colours... eg Feng Shui, Budget... etc
It is great to collect colour catalogs but hold off making final choices until the both of you have decided on an overall room scheme. Paint is available in literally an infinite array of colors and is the most versatile element of your room decor. It is the easiest to change, and, comparing to the rest of your renovation needs, is the least expensive. Go thru magazines, blogs and forums to get ideas. Think of what goes into each room, carpets, wallpaper, laminates... before deciding what colours go to which rooms.
Tip 2 Understand your needs
Do you already have kids?
Are you planning your walls with kids in mind?
What kinda mood are you seeking?
Given the different finishes offered by paints today, Medifresh, Anti-bacterial, Washable, Matte... the list is long... one has to sit down and seriously consider the needs of each room to decide on the type of finish one requires in each room. Matte finishes will hide wall imperfections, but glossier finishes will reflect more light.
Colors are often referred to as "warm" and "cool". Orange, red, and pink are considered "warm" colors, while blues, greens, and violet are thought to be "cool." Knowing the theory behind color can help you select the right tone for the feel you're trying to achieve. There is a very good write up on this on the ICI webpage, click on the "Be Inspired" tab... very useful starting point if you are at a loss when choosing a colour scheme for your room.
Alternatively, you can do a google for the colour scheme that you have in mind and you will get a whole range of suggestions with pictures which you could show your partner, that way, both of you are "looking" at the same picture during your discussions
Tip 3 Tried and tested?
More often than not, we will be collecting a few copies of the same catalogs. Like tiles, one can always test the finish to see if it is what you want for your home. If the paints claims to be washable, try washing the particular sample to see if it is really that washable.
Tip 4 Lighting plays a part
Cut the catalog up to create colour strips of your own, and put it up on the wall the colour is intended upon to view them... it will be different from just staring at it when it is laid on the table.
Look at it during the day, morning, evening, and night. Due to the different finishes of the paints, viewing them in the day under natural light, and under the fluorescent light in the night is also very different. So you have to view them under the various conditions to see if that is the colour that you really like... thus the need for Tip 1!
Tip 5 Expect variation in the tones
Colours in the catalogs are just a small sample. The white you see on the catalog is not always the same white you see when painted on the walls. Beiges and off-whites have subtle color, so compare the paint samples to your laminates and floor tiles to determine if a warmer pinkish or yellow-toned white or a cooler, bluer white is best suited for your room.
Light colours tend to look one shade darker when painted on the walls, and dark and bold colours tend to look one shade lighter. So keep this in mind when selecting your colours.
Tip 6 Why? What? Where? How?
You can never ask enough questions when it comes to selecting materials for your home. One can always go to the nearest store for helpful paint advice. Alternatively, you can online and and do a search or post a query on the forums for additional advise as well. Ask about the different paint finishes, sometimes you can even ask about the differences between the different brands. Ask which paint products they recommend, and why they recommend them as such. Get information on specialty paints such as low-odor, stain-killing primers, chalkboard paint, washable paint, and many more.
Visit a few more stores, and ask the same questions again, and you will soon be able to make a better informed choice for the colours in your room.
Tip 7 Colour consultation
If after all the above, you are still not able to make a decision, get a colour consultant to help.
You can engage a ICI or Nippon's color consultant... They will go to your unit, take pictures and use Photoshop to give you a simulation of how the selected colours would turn out.
For ICI, they charge $75 per visit, and for Nippon, I think $110. Both will give you paint vouchers which you can redeem at selected paint shops.
FYI, we were planning to do a combination of two colours for each room, and it help a lot when it comes to selecting the colour combination for each room after the consultation.
A sample of what the consultant did for us...


Prev: Plumbling... copper or stainless steel?
Next: Progress Update... painting
Monday, August 28, 2006
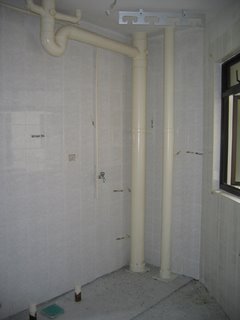
Plumbling... copper or stainless steel?
Now that the floor is done, it is time for plumbing!
Thinking of installing a storage tank heater? Due to the temperture of the hot water, the PVC pipes provided by HDB may not be able to withstand the pressure and heat from the water. Replacement of water piping is always recommended for families who intend to use a storage heater for their hot water needs.
We got mixed reviews about stainless steel and copper piping. Both metals are not prone to rusting, so both are good for the water piping in the home.
The more questions we ask the more we learned... this are our findings:
Copper is a softer material compared to stainless steel, so it is easier to bend. Lesser joints are needed for copper piping when it has to go around a corner. It is also easier to do threading at the joints, thus the cheaper price compared to stainless steel.
Due to the metal properties of copper, they then to oxidize, becoming a dull brown over time, sometimes turning green on the surface of the pipe due to the exposure to iron (the nails that holds the bracket to the wall), making the piping really unsightly.
This can be easily overcome by painting the copper pipes.
Stainless steel is tougher and a plumber needs to be skillful in threading the ends. Loose or inaccurate threading will lead to leakage at the joints. Stainless steel is harder to bend, a skilled plumber should be smart enough not to bend any pipe more than an angle of 45 degrees and using elbow joints for the rest to minimize bending works. Due to the larger number of joints used, stainless steel piping naturally will cost more.
The stainless steel looks good, and given the inert properties of the metal, there is no need to paint over the pipes to prevent oxidation.
Depending on individual preference and budget, both are good materials for use in the home.
Stainless steel with a good quality plumbing workmanship is always recommended if one intends to live in the house for the long haul, though copper pipes will do just as well. Our mom and pops are all for stainless steel because of its durability and the neat clean looks.
Coming from the old school of upbringing, heh heh, we chose the stainless steel pipe... and boy do they look good! Silver and shiny, really gives one the feeling of looking at something that is brand new everytime you look at it! *grinz*
Prev: Progress Update... wetworks! (part 2)
Next: Paints... what to choose? how to choose?
Sunday, August 27, 2006
Renovation progress Update... wetworks! (part 2)
well, the floor laying are in progress! These guys are quick! within half a day, they have done pretty much half the house floors!
Laying of floor tiles... a messy process...


Cathing the alignment to ensure the tiles lines are nicely arranged, heh heh... created a sort of a personal run-away...
Models anyone?

And the amazing part is, within a week, the floor is done!


Grouting included!

Prev: Progress Update... wetworks!
Next: Plumbling... copper or stainless steel?
Renovation progress Update... wetworks!
After going around to survey for the various material for our home, we finally decided on going to:
Hafary Pte Ltd
15 Defu Ave 1 Singapore 539538
6383 2314
Look for Ian... good and patient sale person, willing to cater to your numerous requests for samples to ensure that you are choosing the right tiles for your home. Best shopping experience when seeking materials for the renovation.
Floor tiles are delivered... together with the hollow blocks for the study room wall... our champion tiles. Reminds me of the dumex adverts long long ago... go like a champion go, go like a champion go! heh heh...
 xp... dunno whose clothes... xp

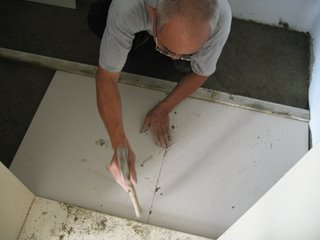
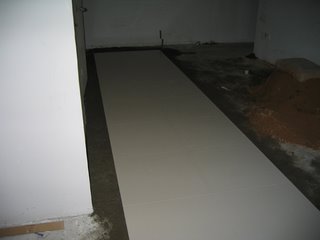
Took the chance to sneak a peek at what the floor will look like. Placing four pieces together gives a pretty good preview to what the floor will look like

Toilets... a layer of water proofing before the overlay is carried out...


Prev: Floor Types
Next: Progress Update... wetworks! (part 2)
Tuesday, August 22, 2006
Floor Types
Defects are fixed, renovation should start soon. It is time to select a suitable floor for the home. Walking around in Balestier, one would find the convenience of visting the most popular floor supplier around, namely, Hafari, Liang Heng Seng and Soon Bee Huat, located almost side by side to each other.
There so many type of tiles and material to choose from, and we were spoilt for choices... even within the same class of tiles (eg Homogeneous), there are various quality to look out for! sigh~~~ it is a long process to find the right tile for the budget, and the home.
Again it boils down to the wants and the needs of the individual. These are my research info to get one started
MARBLE
Pros
- Natural hard stone that comes in a variety of shades and hue, from off-white to brown, gray or pink.
- Creates a timeless look.
- Flat, smooth surface. Marble can be grinded to make it level, making the joining lines almost invisible, making it look as if only one piece of material is used for the floor
- Cool to the touch, especially suitable for hot climate in Singapore
Cons
- Expensive
- High maintenance.
- Although hard, they are softer than granite, thus more prone to scratches. Easily repaired with a fresh polish.
- Porous by nature, marble stains easily when spills are not cleaned up immediately.
GRANITE
pros
- The hardest stone used for flooring, making it durable to wear and tear
- Granite is a highly polished stone, making it easy to cleaned and maintain
- Cool to the touch, especially suitable for hot climate in Singapore
- Contains more reflective crystals, thus providing more glamour to the overall look of the home
- Usually comes in darker and richer tones, well suited for people who prefer a dramatic design for the home.
cons
- The highly polish surface can also becomes too smooth and slippery which demands additional care when walking on it
- Granite tiles are expensive, prices ranks a close second to Marble.
HOMOGENEOUS, POLISHED
Pro
- Man made material created to be as tough as granite
- A wider range of effects/designs and colors
- Can be polished to make it reflective shine like those of a mirror
- The polish of Homogeneous can last longer than the shine of marble.
- In an event of a breakage (due to fallen objects), unlike ceramics, Homogeneous tiles will not show a tile base/ body of a different color.
- Patterns/ designs are more subtle and predictable, without the ugly crack lines and spots usually found in natural stones
- With much lower water absorption rate and higher density
- cheaper than natural stones
Cons
- Depending on the skill of the tiler, tiles laid may not be even
- Warpage may occur during the process of manufacturing
- Cos it is synthetic, not possible to polish/ grind to make the gaps between slaps to give the seamless look
Ceramics Tiles
Pros
- Low Cost and more valued for money
- The widest popular range of color, texture and design
- Shortest time needed to lay
- The pattern of ceramic can be repetitive and constant, therefore more
acceptable by the majority
- Can be glazed to make it shiny but it's not as long lasting as compare to the polished surface of Homogeneous tiles or natural stones
- Comes in all kind of sizes
Cons
- In an event of a breakage (due to fallen objects), will show the tile base/ body of a different color.
LAMINATES
Pros
- Quite scratch resistance.
- Alternative to parquet
- Easy to install and requires no 'drying' time
- Ideal for bedrooms or raised platform/flooring.
- Creates a 'warm' cozy feeling.
- No hacking is necessary. Can be laid over existing tiles. Only the skirting needs to be removed.
Cons
- Sensation under feet is synthetic.
- May only mop with 'dry-mop'. Water left over may leave watermarks.
- Will discolor if exposed under direct sunlight.
- Depending on color, not ideal for large area, as it may look cheap and synthetic.
Prev: Floors... how to decide?
Next: Progress Update... wetworks!
Floors... how to decide?
Doing a search on the forum Renotalk forums and this forum Singaporebrides forums would usually bring up quite a few threads on this topic
Anyways... to start you off, there are a few questions you need to ask yourself first
1) What is your renovation budget?
2) Are you the kind of person who is willing to maintain a high maintenance floor?
The norm for most families these days, Homogeneous is a popular choice... and laminates for the bedrooms are a close second
Kitchen, usually use non-slip homogeneous as well
The market rate today...can range anywhere from $2.20 all the way to $15.00, depending on who you get it from, where you get it from and what brand you are getting.
Different colors also command different pricing, whiter colors commanding slightly more than the colored ones within the same range for a particular model
Based on my renovation research, and using the average quotes...
doing laminates, including installation, works out to about $4.50 - $6.00
doing homogeneous for the same area, including labor and wastage, works out to about $5.00 - $6.50
depending on the price of tiles or laminates one chooses... the difference is not really a lot if one is choosing similar priced materials
the cheapest flooring we got for a 128m^2 area, excluding the toilets, is about $5.5-6k
Usually the labor cost vs material cost is about 1:1.5
That is what we were using as the yardstick to compare the different renovation IDs
Polished Homogeneous tiles from which country is good .. China or Malaysia ?
Hmmm... from my various conversations with the different suppliers, we gathered that Malaysia tiles are really dependant on luck... if you happen to get a good batch, all the tiles will be evenly thick, else, it will be a nightmare for the tiler who is going to lay your floor
as for china Homomogeneous, well, according to most of the suppliers, as long as the tiles are in the >$3.00 range, you are quite safe. Cos of a more stringent QC, that is why the price range is around there.
Again, if you decided on a tile around say $2.50 to $2.80, there should not be an issue as well, as the cost of creating the tiles really varies on the color, the whiter it is, the more expensive. QC is still done on those tiles as well, maybe material used is different... I guess
Champion tiles (the brand) are the favourites among the china homo tiles for the plain colored ones, but if you are looking at tiles with patterns or grains, champion will have less choices.
end of the day, as long as you like the tile, and looking at it, you feel that the tile is good, then go for it. You can always tell the sales person to lay at least two pieces of your selected tile on the floor to let you get a general feel of what it would look like.
Point to note though, looking at the tile on the wall and feeling it with your hands, it totally different from looking at it on the floor and stepping and feeling it with your feet!
More on the characteristics of the different tiles and materials available for flooring in my next post!
Prev: Renovation progress Updates... the beginnings...
Next: Floor Types
Monday, August 21, 2006
Renovation progress Updates... the beginnings...
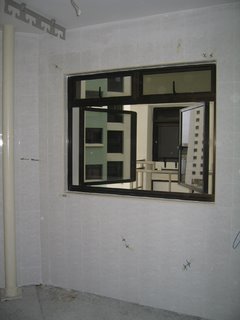
given the way our flats are built these days, larger beams are needed to take the load of the homes that are being set up... so, unsightly and useless holes in the walls are inevitable.
Lobang covered...


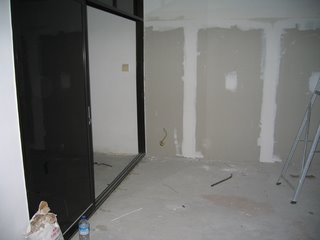
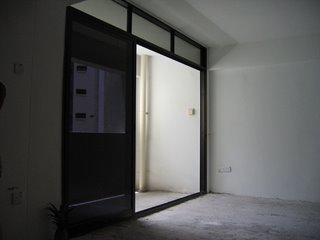
To make the living room more spacious, the doors at the balcony was removed...

Sand and cement everywhere! Crucial ingredients to that marvellous floor!


heh heh... that is my wife to be...
on her rounds of inspection...
Prev: Pre-renovation Defect list
Next: Floors... how to decide?
Pre-renovation Defect list
This is a particularly good site that we came across during our research. It is a very good starting point to formulate your own checklist to seach for pre-renovation defects before your renovation starts.
Checking for Defects
To get you started, this is the pre-renovation checklist we used.
In fact, you can try to download a copy of the defect checklist here:
Download Defect Checklist! Click me!
Hope it is useful for you!
Good luck to your renovations!
Prev: Searching for pre-renovation defects....
Next: Renovation progress Updates... the beginnings...
Friday, August 18, 2006
Searching for pre-renovation defects....
When we first open the door to our new home, we were ecstatic! This being the biggest investment of our life, the starting point to a journey together! After the initial euphoria of finally stepping into our new home, admiring the home and the various views the different rooms offer, it is time to get down to business! Finding pre-renovation defects!
Nothing is perfect in this world. This is especially true when the product is the result of a combination of people working together to produce it… in this case, our flat.
HDB has put in place procedures to allow the reporting of pre-renovation defects, so that they can do the necessary rectification before renovation starts. This is to reduce any argument you may have with your renovation contractor/ID when you find a defect during the course of your renovation.
It is therefore, VERY, VERY important to make sure you list down ALL defects (as many as you can find) to get the estate manager to fix it for you before your contractor starts the renovation works.
If you have already engaged a contractor/ID, you can compile a pre-renovation defects list together. If not, the following steps will be useful to seek out the various pre-renovation defects when reporting to your branch office.
Arm yourself with a marker, masking tape, a night light that is able to plug into any three-pin socket and a metal rod (spoon, spanner... doesn't matter). The rod is mainly for the purpose of finding hollow tiles.
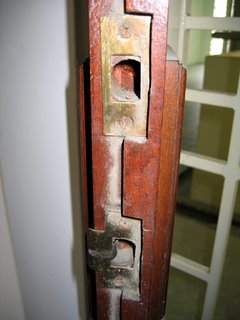
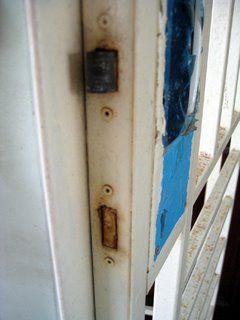
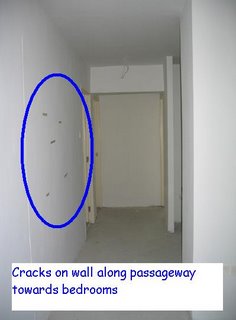
Now, with a fine tooth comb, go thru the rooms, one by one, and inspect every nook and cranny. Any hairline cracks, any holes that are not suppose to be there, report it.
Try all the switches, ensure that they are easy to switch on and off. Plug in the night light to see if the electrical points are ok. Ensure that the electrical points are not mouldy. Anything you see, that you are not happy with, note it down, and use a masking tape to indicate it clearly. Don't worry about the paint peeling off when the tape is removed, you are gonna be painting the whole house when renovation start anyways.
Check the toilets... ensure that the taps are working and not mouldy. Unless you are going to hack away the existing tiles and re-do them, check the tiles for defects, and with the metal rod, tap lightly on all corners of the tile. Some tiles are hollow only in one part of the whole tile, so it is imperative that you tap all corners of the tile to ensure that they are not hollow.
This is gonna be a tedious affair, we know, but it is important! Your water-heater, bathroom accessories are gonna be mounted on top of these tiles! There were cases where contractors have done up the whole house, attempting to drill holes to mount the bathroom accessories, the tiles for a whole wall has collapsed cos they were hollow.
FYI, we took two days to go thru all the tiles in our home, one for the toilets and another for the kitchen.
Same goes for the kitchen. This is especially important, as your kitchen cabinets will most likely be wall mounted. Any hollow tiles will not be able to take the weight of the wall mount. There has been cases where the cabinets collapsing due to this, so do take note.
If the unit you are getting is a premium one, where the flooring is done as well, ensure you do the same for the floor tiles. Pockets of air trapped in the hollow tiles, may sometime expand due to the hot weather here, causing the tiles to pop when the pressure is too much for the hollow cavity to contain it. So it is important to get these rectified as well.
When HDB tries to build flats quickly at a budget, this kinda workmanship are bound to happen, so get it all fixed before renovation starts.
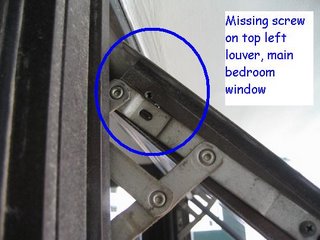
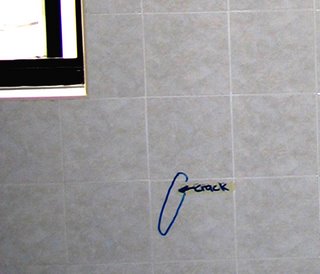
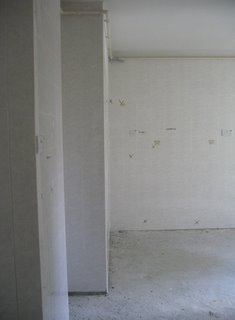
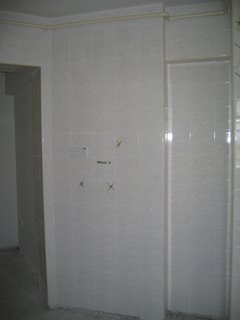
Some of our defects…

Prev: Pictures of Original Home
Next: Pre-renovation Defect list
Thursday, August 17, 2006
Pictures of Original Home
We have gotten our keys, and so begins our journey towards building our home.
Before that can be done, one has to open the house to check for defects. HDB flats now a days are not built like those of our mom and pop's era, where the finishings are much better.
Welcome to our humble abode...
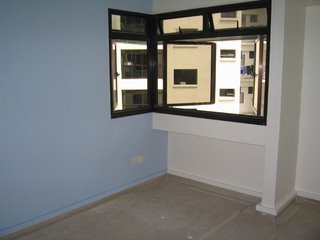
the balcony where a great view awaits...
... and a really beautiful view indeed *grinz*

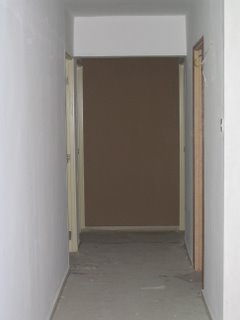
Walking further in reveals... the passage to the inner sanctum...
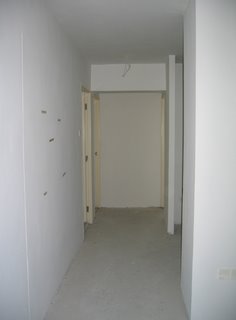
and on your left is the Master,where Papa Gorilla and Mama Mushroom rejuvenates...

 on your right is the study...
one of the common Bedrooms

... and the place where growling stomachs get tamed

Prev: Renovation Strategy 5 and 6
Next: Searching for pre-renovation defects....
Wednesday, August 16, 2006
Renovation Strategy 5 and 6
We have always had problems visualizing what we want to do in our home, especially when you and your significant other cannot seem to communicate to each other the mental picture of what constitutes a comfortable home. Where to put the shoe cabinet? Where to put the TV console? Can a king size fit into my master room?
A real pain, isn't it?
Well, have you ever stand at the void deck of HDB blocks, and look up at the ceiling?
Pay attention to the beam structure... does it look like the outline of the unit just above it?
If one were to stand where one's unit is, you will likely be able to see the same outline of your unit as well, rite?
There you got it, instant lifesize floorplan, right at the very void deck of the block where you bought your unit. With a floor plan in hand, one should be able to imagine where the walls and doors are for the unit purchased, both of you should be able to discuss some of the space layout. With the help of a ruler and some chalk, you could even draw the outline of where the various furniture could be placed!
so Strategy 5, to preview what your unit would look like, go to the void deck of your block, stand directly under the unit you bought, and you get an instant life-sized floor plan to help in your visualization of your new home.
Now, we are all owners of new homes here. With the exception of those who bought resale, the block that our selected unit is in, would most likely be one where everyone is also in the midst of renovation. Taking a walk around your block will see many units in various stages of renovation. R~~ight... you must be thinking, so? what's it to me?
Well, for one, if it is the same block, it is most likely, the same floor layout as the one you selected.
two, if you have not gotten your keys, and would like a preview of your home to be, this is a good chance for you to take a sneak peek!
three, you are in the midst of seeking a renovation ID, well, this would be a good place to start as well, especially when you are looking at some form of finished product... flooring done... floor tiles level... carpentry up... carpentry finishing satisfactory... beautiful design... etc the list is endless. Remember we mentioned to request for viewing of show flats or renovation works in progress? well, you are screening the renovation works before even meeting your "potential" ID/contractor! save you a bunch of time as well! *smiles* If the home is renovated by this particular ID/contractor, there must be something good about them that got them the job, so, it is a very good starting ground for screening renovation contractors.
four, got no idea what to do in your home? well, these home in renovation progress will be a very good starting ground to see what features are suitable for which corner of the home. Nothing beats looking at the real thing!
Usually, there will be people in the homes that you are going to visit, and they are most of the time more than happy to show off the new home to would be neighbours or customers if the fella is a ID/contractor. So the next time you try to visit a home in renovation progress, that shabbily dressed person you are looking at could well be your future neighbour... so Always be polite!
Many weekends, dressed in my singlet and bermudas, I have encountered a few couples who came by my unit, and thought I was the contractor, so they just walked in, took their time to view my unit, and some left without even saying a word of hello or thanks... it was so rude!
Strategy 6, go visiting! visit as many units as you can in your block and the neighbouring blocks as well. This will allow you a better vision of what your home will be like, and best of all, a very good starting ground to source for ideas for renovating your home as well. *smiles*
Prev: How to differentiate from Renovation ID from Contractor??
Next: Pictures of Original Home
How to differentiate from Renovation ID from Contractor??
Ok... from what we can see during our ID shopping...
Well, contractor now a days also cover everything... from flooring to ceiling to electrical works... unless you look for specialty shops contractor, where they specialize in a particular fixture, eg, wetworks or ceiling and cornices...etc, then there is very little difference now a days, cos contractors are also doing a little bit of design in order to clinch your deal to renovate your house.
One thing with contractor though, no sweet talk about how to layout your house, no lengthy explanation of which material over which material. They generally just take down your requirements, and tell you they will call you soon. That's it, less than half an hour of meeting.
oh, their design is also quite simple, mostly functional pieces, dun expect blow-your-mind designs. Some of them also hire undergraduate interns to do up the design on your house... so it depends largely on your luck whether you get a good design or not.
ID on the other hand, will tell you all the long and short of the designs they do, the material they used, and they will show you album after album of their pride and joy (finished houses renovated by them). They will also go on to tell you about the different things you can do, the themes you can follow, the curvatures and lines of their work and how seamless it seems when you walk in to the house....etc etc... and of course, how they will coordinate the renovation work of your house when you confirm with them.
you will know what we mean when you start to shop around for one.
One thing that puzzles me though, a very sharp contrast between a contractor quote and a ID quote is the pricing of their wetworks and carpentary.
Contractors tend to price their flooring, hacking and wetworks at least slightly more than what an ID would quote. But when it comes to carpentary, their prices only vary about 10% of those that the ID quote.
At the end of the day, the pricing of these contractor-cum-ID renovation packages are very similar to an ID’s. So, one may end up with a contractor that dun charge designer fees but item for item, may be more expensive. Bargaining at the end of the day will bring the pricing much lower than that of an ID though... so be prepared to bargain aggressively for a reasonable pricing! Thus the need to get many quotations to do a price comparison *Grinz*
At end of they day, it still boils down to whether you like the workmanship of the fella you engage or not.
Just to get you started... a summary based on my renovation research
1) Kitchen cabinet cost about $150-230 per foot run of top and bottom cabinets, depending on the material used, laminates vs veneers and whether you are using the same laminates on the inside of the cabinets or not
2) Kitchen tops --> for solid surfaces, it largely depends on the brand you select, it could range anything from $65-145 per foot run
for granite tops, it is ranging from $100 per foot run
3) Floor laminates, typically cost about $4.50-6.50 (inclusive of labor to lay it) depending on the type of laminates you use... varies from brand to brand, thickness of the laminate strips and the type of strips you use (eg, timber, parquet...)
4) Light fixtures typically ranges from $30-45 (including labor to install) depending on the lights you buy, about $40 for a single socket, $50 for a double. $70-90 for a SCV point and $30-40 for a telephone point
5) Grilles for balcony is calculated on a per square foot basis, for a typical EA, installing grilles on all the windows except for the toilets, will cost in the range of $1000.
As for false ceiling, it is also calculated on a per square foot basis, and IDs usually count them in as part of their reno packages, so unless you specifically ask for the price, they usually dun quote
Doing laminate flooring, including installation, works out to about $4.50 - $6.00 per square foot.
Doing homo for the same area, including labor and wastage, works out to about $5.00 - $6.50, depending on the price of tiles or laminates you choose... so the difference is not really a lot if you are choosing similar priced materials, or if you are only covering a small area with laminates (ie, only bedrooms or only one study room).
Prev: Renovation Wants vs Needs
Next: Renovation Strategy 5 and 6
Renovation Wants vs Needs
Like I said in my earlier postings, we all have a mental picture of what a comfortable home is. And many a time, this mental picture has lots of fixtures which we find lacking in our current homes, or maybe, it is a fixture that we hope to have or feel we need in a new home.
Examples would be kitchen islands, built-in beds/platform beds… etc
So, how does one segregate needs from wants? The usual guide would be if-I-can-live-without-it-without-compromising-my-current-comfort, then that is a want, not a need. *grinz*
Here are a few questions that would help.
Do you have the budget to build everything in your renovation quotation?
Can you live without such a fixture? (ie kitchen island, platform balcony, day beds, feature wall for TV console, marble floor, granite walls… etc)
Is it required? (platforms, platforms bed, custom-made built-in beds… etc)
Can a reasonable replacement be bought commercially at a lower cost? (TV console, MBR bed frame… )
Do you need the fixture today? (MIL wardrobe, feature for TV console, window grilles… etc)
Can this feature wait till the next round when we do reno additions in future?
Sometimes, it is the feasibility of the material used that can help to reduce the
costing.
One good example would be using solid teak wood for all carpentry vs using pine wood and laminates to achieve a similar look, OR
Using white marble flooring for your HDB home vs white Homogeneous tiles (c’mon, you only get to live in that place for 99 years at the most, is such an expense necessary?) OR
Plastering your whole house to ensure that every wall is smooth and straight OR
Hacking the brand new wall tiles in your new home so that you can put in some nicer looking tiles…
The list is endless… so save where you can. Remember, not everything is about looks, a cozy home is what you make of it, not what you put on the walls or the floor.
Of course, a renovation need not only be about needs and not wants. Can you imagine spending more than a year’s worth of salary into renovating your home, and not be able to indulge in a want here or there? With prudence, you can afford to spoil yourself or your spouse with one indulgence… say for example, the Groche shower set, or maybe an exquisite chandelier for the living room…etc
When it comes to renovating the home, it is of course the best if one can afford to do everything one desires to make the home the other heaven on earth… (the first one being in the warm embrace of your significant other *winks*), but reality is never like that. It is never feasible to take a hefty loan to do it, as you will just be making life miserable just to achieve that materially comfortable home.
What you are doing when listing down your renovation requirements, is that the both of you can be discussing on the same wavelength on the various needs of the home, and that one or two indulgence that both of you can afford.
Marriage is a long journey, and building the nest is the first step towards that journey… and that first step alone, is full of obstacles that one must brave to embark on this wonderful journey.
Prev: Renovation Strategy 3 and 4
Next: How to differentiate from Renovation ID from Contractor??
Renovation Strategy 3 and 4
Then there is the need to seek market pricing… to see if you are being quoted a reasonable price for your renovation needs.
Take for example, flooring. Go to a contractor that only do wetworks and flooring to get a quote for floor only, and you will likely be able to find out the floor area to cover in square feet and the cost of the tiles and workmanship.
Once you got that, take out the yellow pages, make a few calls to a few other contractors. If they are willing to entertain phone queries, make the same enquiries you did earlier. One company I know who is willing to entertain phone queries is White Horse.
Strategy 3, use the yellow pages, it is your best friend in the world. Do a few calls to the specialty shops, and make enquires, then you will know what the specialist are charging, and see if the renovation quotations you get are about the market rate, , you will more or less be able to gauge whether the price quoted to you by your ID is reasonable or not.
The same can be done for carpentry and electrical works.
You can also make enquires about the pricing of electrical works when you are shopping for lights. Many of these light shops do cater electrical services when requested.
Once you decided on a 'reasonable' price comfortable to your pocket, then request to see their show house or at least a flat that they are currently renovating to see if their workmanship is up to your acceptable standards.
This can vary from individual to individual. Some good examples, visiting some of the on-going projects of the recommended IDs in the renovation forums, what was deemed reasonable workmanship by some of the forummers, did not agree with our pre-conception of what good workmanship is about.
Strategy 4, request to see their on-going renovation project first. This is to gauge their workmanship. If you feel their renovation workmanship is not up to your personal acceptable standard, there is no point in going on with the discussions, as you will not likely be engaging them for your renovation works.
Now the next important step, is to separate renovation WANTs and NEEDs. More on that tomorrow... 8D
Prev: Renovation Strategy 1 and 2
Next: Renovation Wants vs Needs
Renovation Strategy 1 and 2
Well, to get what you want at the budget you have, will require a lot of leg-work to seek out that elusive renovation contractor/ID that will do good work and charge a reasonable price
that is why breaking-down all your renovation requirements into something more detailed, would be able to help you better. Get your first quotation first, using that as a guide, do a little reseach on the web, post questions on the forums and see if there is anyone who did something similar, and compare the pricing.
Visiting renovation blogs also helps, as it lets you visualize what you want to do for a particular space, which some one has already done.
Managing your expectations is very important! We also started off with a dream vision of what our house is gonna look like, but after extensive leg work and research, many of our original renovation plans were scrapped and revised, due to feasibility of the features originally planned.
Difference in material used is also a major cost factor, extreme example would be using marble flooring vs Homogeneous. Things like veneer laminates vs glossy laminates, open concept cupboards vs closed ones also affect the amount of material you use.
PS: Veneers cost a heck of a lot more than normal laminates.
Therefore, Strategy 1, always put down in your list, renovation items for the WHOLE house.
Like we mentioned in an earlier post, there is a certain guide that the renovation contractors and IDs use when if comes to giving you a quotation, especially when it comes to furnishing the whole house. Depending on the home size, they will usually quote withing a certain range. So when you furnish the whole home, you will most likely know what you are gonna be getting, especially when you start scaling down your expectations as the search goes on.
Then come the next most important thing... itemisation
ALWAYS ask for your quotation to be itemised, as much as possible, get him to give you a break-down in the renovation items he is quoting you. Most IDs are likely to quote you based on the renovation package they are offering, and then do a add-on to the package for items you require but is not listed in the original renovation package deal they are offering.
Get a general quote with renovation package and the additionals first. If you are not satisfied that they lump their items in the package, go back to them to get a requote of everything... including the additionals... if the fella is not interested to do it, then you know he/she is not interested in doing your business, go else where where the ID is willing to.
That was what we did when shopping for our renovation ID. This way, you will be able to do a better comparison with all the renovation IDs/contractor you sent your floor plan to.
Once you have more or less shortlisted a few renovation companies, then do a requote for each item, including the foot run and square area calculations before deciding to engage them or not. This will allow you to do a further breakdown of how much they charge for each item, on your own, to do a more comprehensive comparison, and to see if the price is really reasonable. You will be surprise at the difference when you do that.
In our search, we have people quoting us prices for kitchen cabinets that range from $150 to $300 per foot run, and that is only for the bottom cabinet.
Don’t be afraid that the IDs will find you petty. Rather they jin jin ji jiao and we know how much exactly each renovation item cost, then to later have them saying..."hey, your quote did not say this is included... gotta pay $XXX to get it done"
get a general quote with renovation package and additional items first, then do a requote for each item, including the foot run and square area calculations before deciding to engage them or not
so, Strategy 2, ALWAYS ask for your quotation to be itemised, as far as possible.
More in the next post…
Prev: Journey to a comfortable home begins with a single step
Next: Renovation Strategy 3 and 4
Journey to a comfortable home begins with a single step
We all have a mental picture of what we envision as our dream home. Whether this vision is mutually shared by you or your spouse, will largely depend on how well you can communicate this mental picture to your significant other.
dun worry, if you feel that way you are not alone.
So, first on the list, sit down with your spouse, describe as vividly as possible to him/her, what you see in your mind's eye when you are looking at your new home. Be detailed, from the floor pattern to the colors of the wall to the fixtures you have in mind, list it all down. This is very crucial, as a wrong communication, will lead to many days of un-happy disagreements over what to get and buy.
Now, once the both of you are sharing the same mental picture, make a rough list of what you would like to do in your home. Make sure you furnish every room, nook and cranny with all the furniture you want, all the fixtures you would like to see. The reason is simple. You see, in the market, every renovation ID will have a guideline of how much doing a typical HDB flat will cost, which is what they will usually use when doing an estimation of the renovation quote they give you... and it goes something like this:
3-Room == $15,000 - 24,000
4-Room == $24,000 - 30,000
5-Room == $30,000 - 35,000
Executive == $35,000 & above
so, taking an example of a 4 room flat, even if you were to only furnish the living room, master room and kitchen in your renovation list, you will still be quoted an amount that comes to about $24,000+-
so, now you are at the point where you are going to list down what you want to do for your home… a typical example is this
1. Kitchen Cabinets
2. Laminates for 3 bedrooms
3. Raised Laminate Platform for Living
4. False Celing at Living / Dining / Masterbedroom/Passageway
5. Wiring + Lightings
6. Windows Grille for Balcony
and the questions you need to ask
hmm... how big is your house? new or re-sale?
how many feet of kitchen cabinets are you planning to make? are you making new or replacing the existing ones? are you planning on solid surface top? or granite top? or postform top?
your laminate platform, it really depends on the size and height of the platform you are gonna get that determines the price
are you doing all false ceiling or mix with L-boxes? how bright do you want your house to be? single or double tube downlights?
How many more power sockets do you intend to install? Are you shifting any existing ones? Replacing existing wiring in your home?
how large is your balcony window?
you need to be more specific before you can start to realize a renovation list that is going to be within your budget.
Split your renovations to two main categories, NEED-TO-HAVES vs GOOD-TO-HAVES and you will find streamlining your wants much easier
Prev: First step
Next: Renovation Strategy 1 and 2
First step
okay... finally, we got all our material organized! We are hoping this renovation blog will be informative, especially to the new couples who just got their homes, and are finding themselves lost in the big world of renovation. We know... we were there. So join us in our journey, and hopefully our knowledge accumulated will be useful to you.
It all began many moons ago when we decided to get a place to call our own. The story goes a longer way back, so to cut the long story short…
We have just confirmed our unit. This is where our humble abode resides...

From the time we confirmed the unit, till the time we actually get the keys, there is a few months for us to ponder over who to engage for our renovation, what to renovate for the home. So the hunt for the elusive CHEAP-AND-GOOD renovation ID/contractor is on.

We have never realised how many renovation IDs are out there till we started on our quest to seek the best ID/contractor to do up our home.
In preparation prior to getting the keys to our new home, we have bought countless renovation magazines, trying to get ideas, and we always thought that we could just go to the renovation ID/contractor, point to a picture and say "nah... that is what i want to do... how much?"

It was really an eye-opening experience, what with the different material used, the space planning involved... aiyoh... susa, I tell you... susa =)
Then you got to start considering where all the little kinck-knacks go, you have to plan for where you additional storage and stuff like that.


Thanks to the many friends we have met in this forum Renotalk forums and this forum Singaporebrides forums, we managed to come up with some renovation strategies to get us started... more on that tomorrow, when I will list the steps that will be helpful when seeking out renovation IDs.
and so the quest to a comfortable home begins...
Prev: My first post in my very own renovation blog!!!
Next: Journey to a comfortable home begins with a single step
![]()
